IIoT - MQTT
MQTT (Message Queuing Telemetry Transport) is an open-source IoT protocol that allows for the transmission of telemetry data as messages between devices. Device communication always takes place by means of an MQTT broker (e.g. Mosquitto https://mosquitto.org/).
Messages are sent and subscribed to based on topic names. A topic corresponds to a path (e.g. device1/temperature). Subscribing to messages is done by specifying a topic filter. Wildcards are also permitted (+ for one level and # for multiple levels).
The message format is not fixed, which means that a JSON string or any data structure can be transmitted. With the “MQTT Client SL” library, messages can be sent from a CODESYS controller to an MQTT broker, and messages can be subscribed to based on topics of interest.
Introduction
This project will utilize the IIoT Library MQTT functions.
The P2CDS-622 Intro project will default to using the four(4) slot Base P2-04B unit. If your system has a different Base, this can be changed within your project.
This project will not be using any IO Modules, but will be used to demonstrate using the CODESYS debugger on the P2CDS-622 hardware.
The main purpose for this project is to introduce you to the MQTT capabilities based on the IIoT library that is included.
System Requirements and Installation
- This section requires the following:
P2CDS-622 CPU
P2000 Base (any variant)
P2000 PowerSupply (any variant)
Latest version of CODESYS installed on Host PC
Familiarity with the “Structured Text” and Continuous Function Chart (CFC)” programming languages.
Recommendation for Data Protection
In order to minimize the risk of data security breaches, we recommend the following organizational and technical measures for the system that will run your applications:
Whenever possible, avoid exposing PLCs and controller networks to public networks and Internet.
Use additional data link layers for protection, such as a VPN for remote access, and install firewall mechanisms.
Restrict access to authorized persons only, and change any existing default passwords during the initial commissioning, and change them regularly.
If you want to publish a web visualization, then we strongly recommend utilizing HTTPS and assigning a simple password protection to prevent access to the functionality of your PLC over the Internet.
Help
Help is provided in the Help menu, as well as the context-sensitive <F1> key when in the IDE whether a project is open or not.
Currently, the web-based online help opens by default. This can be disabled in the CODESYS options so that the offline help (CHM format) is used.
Install IIoT Library
To access the free IIoT Library functions e.g. Web Client functions, you must install the IIoT Single license with the CODESYS Installer.
This license is located on the CODESYS website store at IIoT License**
Creating a Project
A completed example project was created based on a known good MQTT Broker and can be downloaded here- MQTT project
Note
It is possible you will need to update the P2CDS-622 CPU Device in this project to the latest version. Right-click Device > Update Device and select latest version.
The following steps illustrate how this project was developed.
When creating a project, the main items that need to be done initially are to install the target device’s (P2CDS-622) Package and pick the language that the program file will use.
The project can be made up of many program/design PRG files. These are referred to as Programmable Object Units or POUs.
Start CODESYS and Create a Project
Start CODESYS
(1). Start CODESYS from the Start menu (by default, the path is Programs > CODESYS (version).
You can also click the CODESYS icon that is located on the desktop after installation.
Install the “IIoT Libraries SL” Package
(2). The IIoT Library should be available in the Installer, if not Download the IIoT package from the CODESYS Store: IIoT
Note
This Library does NOT require any payment to download! Just click on the Download button.
CODESYS Installer
(3). Select from the drop-down menus- Tools > CODESYS Installer
(4). In the CODESYS Installer pop-up view, click on Install File under AddOns.
(5). Browse to the IIoT Libraries SL x.x.x.x.pkg file and double click.
(6). The install will start. After completed, close the IDE and restart CODESYS.
Create a project
Caution
To do this project, the steps outlined in the previous section Preparation have to be completed successfully.
We are going to use an example project that is based on the project in installed with the IIoT library to modify.
For reference, this can be found at the install directory on your PC at $USER$MQTT Client SL(version)
A completed example project was created based on a known good MQTT Broker and can be downloaded here- MQTT project
(7). With CODESYS IDE launched, click File > Project Archive > Extract Archive. Select all options in pop-up. Click “yes” on next pop-ups.
(8). Update everything (including Library’s) to latest revisions. May have to add a Library, e.g. Basic OSCAT.
(9). Setup Ethernet ports by adding the NetConfig functionality per NetConfig Device
Add Fieldbus
(Not required)
Add Ethernet Device
(Not required)
Change Base Type (if req’d)
If you are using a Base topology other than the P2-04B, you can change it now.
(10). In the device tree, highlight with a single click the Base (P2-04B) element, then Right-click. Select Plug Device.
The Plug Device dialogue box should appear.
(12). Under the Miscellaneous name, find the Base unit device you want and double-click. Close the box.
The updated Base should be showing.
Review the Control Program
This
(13). Double-click on PRG to view the program file.
The top level program is done in the Continuous Function Chart language and supports hierarchical structure.
MQTT Broker
The MQTT broker is the backend system which coordinates messages between the different clients. Responsibilities of the broker include receiving and filtering messages, identifying clients subscribed to each message, and sending them the messages. It is also responsible for other tasks such as:
Authorizing and authenticating MQTT clients
Passing messages to other systems for further analysis
Handling missed messages and client sessions
MQTT Client
- An MQTT client is any device from a server to a microcontroller that runs an MQTT library. If the client is sending messages,
it acts as a publisher, and if it is receiving messages, it acts as a receiver. Basically, any device that communicates using MQTT over a network can be called an MQTT client device.
This Function Block MQTTClient will be used to establish an MQTT link with MQTT Broker and provide security aspects if needed.

Details of this function can be found in the Help file located in the install directory $USER$MQTT Client SL(version) entitled MQTT Client SL.chm
MQTT Publish
MQTT clients publish messages that contain the topic and data in byte format. The client determines the data format such as text data, binary data, XML, or JSON files. For example, a lamp in the smart home system may publish a message on for the topic livingroom/light.
The Function Block MQTTPublish will be used to publish data
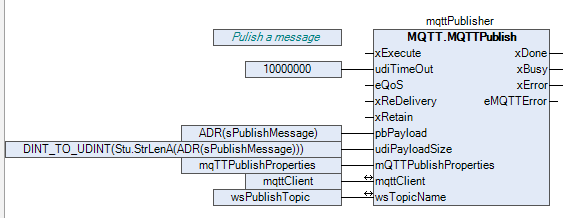
Details of this function can be found in the Help file located in the install directory $USER$MQTT Client SL(version) entitled MQTT Client SL.chm
MQTT Subscribe
MQTT clients send a SUBSCRIBE message to the MQTT broker, to receive messages on topics of interest. This message contains a unique identifier and a list of subscriptions. For example, the smart home app on your phone wants to display how many lights are on in your house. It will subscribe to the topic light and increase the counter for all on messages.
The Function Block MQTTSubscribe will be used to access or subscribe to data

Details of this function can be found in the Help file located in the install directory $USER$MQTT Client SL(version) entitled MQTT Client SL.chm
Utilize the Control Program
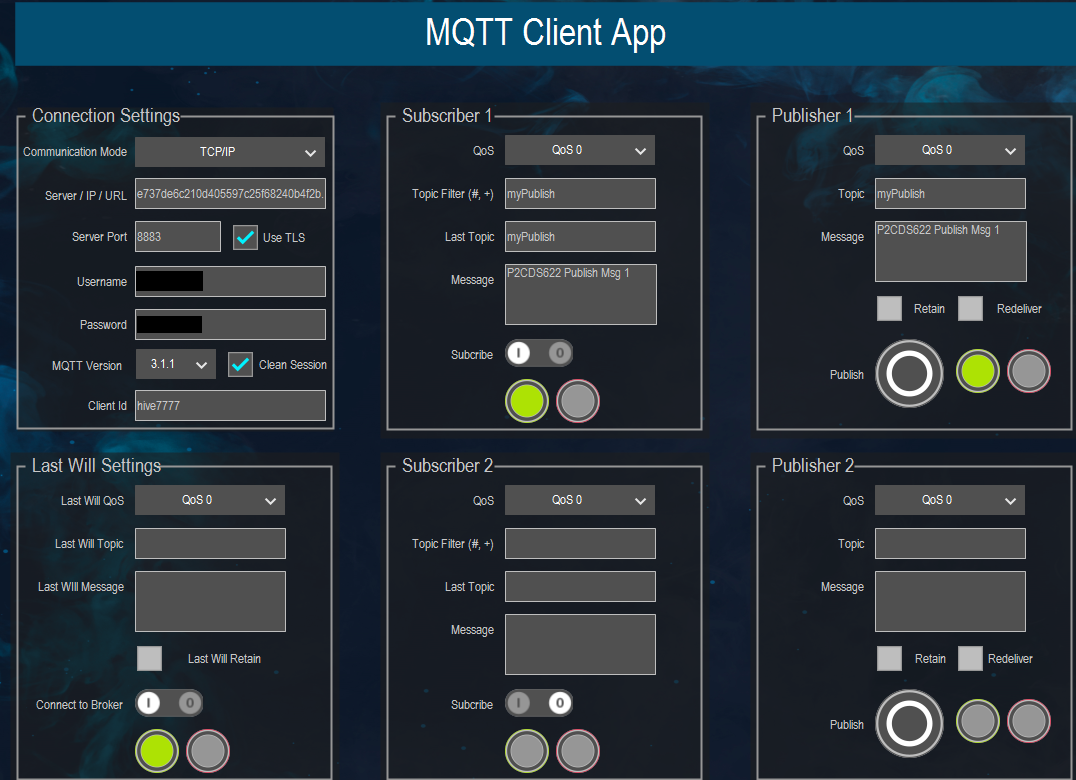
To use this project, data is entered into the Visualization fields.
Since all the items required for a secure MQTT communications are visible with this example program, it can be utilized as a starting template for your own design. You can then use a separate program file e.g. in Structured Text that will access/populate the variables with your own data in the order it is required.
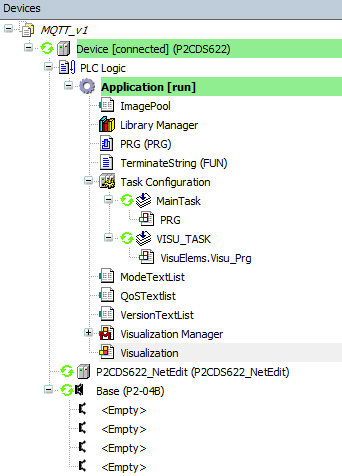
A View of the “Task”
Another very important area in the Device Tree is the Task Configuration section which defines the way in which the program tasks are defined (which POUs are to run on a scan) and the characteristics of the task (priority, speed etc.).
The online help goes into detail for this area. The defaults are good for this project.
Compile the Project
Next we will compile and build the project to download to the P2CDS-622 target.
(14). Select from the drop-down menus- Build > Generate Code.
Connect to PLC and Download
The project needs to be downloaded to the target and but we must first connect to it.
(15). Physically connect the Host PC to one of the Ethernet ports on the P2CDS-622.
Configure Connection Channel to PLC
(16). In the Device Tree, Double-click on the Device(P2CDS622).
A Device tab should appear with the first tab on the left selected entitled Communication Settings selected. Now we need to scan the network to find our device.
(17). In the Communication Settings section, click on the Scan network.
A dialog box should pop up with all the CODESYS PLCs available to connect to on this network.
Note
If you are unsure which unit is the one you want to connect to, on the right side is a Wink select box. Click on this and this P2CDS-622 front panel RUN light should start to flash for 5 seconds.
(18). Select the applicable P2CDS-622 unit and Click OK.
(26). Toggle the Run/Stop switch.
Now the following should be visible- both the Gateway and the P2CDS-622 have the green indicators present indicating the IDE is connected to the P2CDS-622.

Download Application to PLC
(19). Click Online > Login.
A dialog opens up if there is an existing application on the PLC, if so Click Yes to continue.
Successful Download. Ready to Run
The system should show green highlighted Device and Application as shown below:
The  icon indicates connection is active (but program is not executing).
Run and Watch the Application
This section will start the application running and using the debugger features, allow a user to watch the variables in real time, set breakpoints and force variables to a specific value.
Start the Application
(20). Click Debug > Start.
The IDE should now be showing a green “Run” in the lower portion of the status area. Also, the Main Task has the running
icon next to it.
Double-click on the Visualization file in the Application section.
In these fields, enter the following:
- CONNECTION SETTINGS
Communication Mode: TCP/IP
Server/IP/URL: broker.hivemq.com
Server Port: 1883
Use TLS: (unchecked)
Username: (unused)
Password: (unused)
MQTT Version: 3.1.1
Clean Session: (checked)
Clean Id: (unused)
- LAST WILL SETTINGS
Last Will QoS: QoS 0
Last Will Topic: /igotthis/fromFACTS
Last Will Message:(unused)
Last Will Retain:(unchecked)
Server Port: 1883
Connect to Broker: (select the 1 icon)
- SUBSCRIBER 1
QoS: QoS 0
Topic Filter: /FACTS/justtryitout
Last Topic:(from Publisher)
Message:(from Publisher)
Subscribe: (select the 1 icon)
- PUBLISHER 1
QoS: QoS 0
Topic: /FACTS/justtryitout
Message:(message to send)
Retain: (unchecked)
Redeliver: (unchecked)
Publish: (click icon to send message)
Watch the Application
Click on the Visualization- Visualization in the device tree to view the options to enter data.
The Publish/Subscribe items can be tested after the applicable fields are setup and the Broker of choice enabled.
For our example using HiveMQ:

Closing Comments
It is strongly recommended to use MQTT with security. Security (TLS) can be easily incorporated in this design allowing for a Username and Password.