Security and User Management
The P2CDS-622 has five areas of security provided by via the CODESYS IDE and the Runtime software.
Areas of Security
1). Device Security
2). Project/Application Permissions
3). Project File Encryption
4). IDE to Device (P2CDS-622) Connection Encryption
5). Visualization Security
Tip
Much of this material was generated with guidance from “Chapter 18-Security” in the Textbook: “The Book of CODESYS” Much more detail is in this text. It is highly recommended that you add this book to your library!
Also, you can refer to CODESYS Online Help-Security
Device Security
If not installed yet, install the Security Agent add-on from the CODESYS site- **Security Agent** This will enable a new tab called “Devices” in the Security Screen.
The first time the P2CDS-622 is powered up, there is no password associated with the device.
A password can be setup for the device (you are the default Admin) by clicking on Device and in the project tree, select Users and Groups and then Add.
Pick the Default Group > Administrator.
Define your Name and Password. Select Password can be changed by user.
Other Groups/Users outside of the Administrator can be given device passwords also and are setup in this area.
Groups and Users can be removed by the Administrator.
Note
Once a password is setup for an Admin, there must always be one setup for the Device. It can be changed but the unit will always require a defined Device password.
Danger
If the Device password is lost. The only way to recover is to perform a Factory Reset with the Firmware Update Utility. See F/W Update- Factory Reset.
Access control i.e. to get logged into the device and the associated privileges, can be setup initially by some default groups (discussed in more detail below).
This is accomplished with the Device > Users and Groups (synchronize to refresh) section.
Project/Application Permissions
To steps to enable Project Level security and set the permissions to edit a program, logon to the CPU, etc. are defined below. To do this an Owner must be defined, who “owns the project” and handles all further project setup permissions.
Initial Project Security
To create a password, open the project in the CODESYS IDE, go to Project > Project Settings > Security and select the Encryption, Password options and define a password.
Once a password is defined, the CODESYS IDE, will prompt you to login every time the project is opened.
Configure an Owner
An Owner of a project has full access to everything associated with the project. Owner credentials are required to create other users and their associated permissions.
First you need to setup the Owner for the project or Application. When the project is first created there is a default Owner with no password. A password must be setup and it is recommended that you also create a new Username by doing an Edit.
Select Project > Project Settings > Users and Groups and you should see something similar to the following,
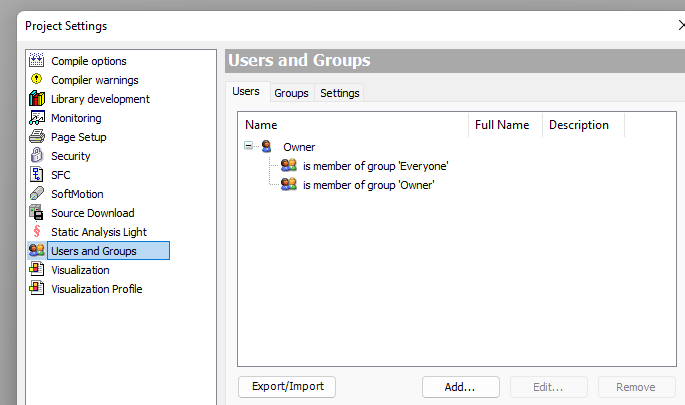
Select the Owner and click Edit .
- A pop-up will appear and edit it as follows:
LOGIN NAME - name you want for Owner.
FULL NAME - additional name info (optional).
DESCRIPTION - additional info regarding owner (optional).
OLD PASSWORD - delete all characters so it is blank.
PASSWORD - password for this owner.
CONFIRM PASSWORD - reenter
Select Memberships as Owner, click OK

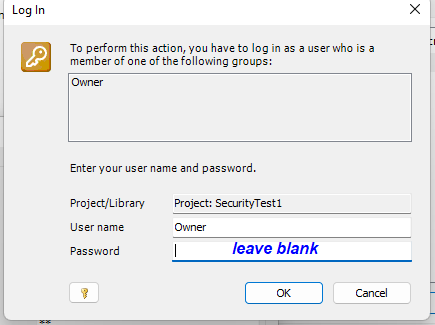
Another popup window will appear, enter Owner and leave the Password blank as shown below,
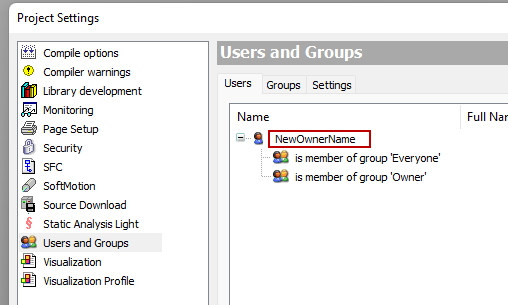
After this, the new owner is setup and should look as follows:
Danger
If the Owner password is lost, there is no way to recover the project without it.
Create Users and Groups
Once an Owner is established, you can now add additional Users and create Groups of Users. For example, the Test Engineering group may have permissions to login, view the project and logging info but not be able to Edit objects.
You can either create Users first, then create Groups for those users be a member of, or you can first create the Groups you want and then add Users to these groups.
The example below first creates the Group and then adds Users to the Group.
Select Project > Project Settings > Users and Groups, click on the Groups and add. For Username/Password use the new owner Username and Password.
To add Users, in the previous project setting window click Add under the Users tab. Assign a Username and Password for this user and select their Membership (i.e. which Group they belong to).
If you are not currently logged in as the owner, you will be prompted to login to add the Group.
Access Control
Next, you can assign Access Control for a Group for this Application.
Right-click on the Application in the Devices view and select Property > Access Control tab.
Permissions can be assigned in the following areas:
VIEW - users in the group may only view the contents of the object. No edits permitted.
MODIFY - users may View and Modify, but may not delete the object.
REMOVE - users may delete the object and all its dependencies.
ADD/REMOVE - users may Add or Remove objects that are below this object, e.g. a FunctionBlock.
Select the permissions for each group as necessary.
Then for example, if an Edit is attempted on a file, you will be prompted to login as the Owner to be able to modify the file. A group without this privilege ( Deny ) will not be allowed be allowed to modify the project.
You can verify this by logging out if logged in as the owner- Project > User Management > User Logout, and attempting to edit the project.
You will be prompted to login as a user with Modify access control.
Limit User “Everyone” Access
By default when the CODESYS IDE is opened and no one is logged in, Everyone is the default user and thus everyone including groups with limited access which are part of the Everyone group (and its associated wide open access) have open access.
To resolve this we need to limit the Everyone user to View only.
This is done by selecting Project > User Management > Permissions.
Then under the Project objects and Users, groups and permissions, and every subheading i.e. Add or remove children edit Everyone to Deny
Only grant the View option
Now whenever an activity is attempted that has limited access, a login prompt will pop-up and require login by a user to a group that can take that action e.g. Modify.
Objects
Objects in CODESYS provide specific functionalities for creating your application. For example, Applications, Programs, Functions, Library Manager, Devices, and Image Pools are all Objects.. Objects are managed in tree structures in the Devices, POUs, and Modules views.
Objects within a Project can be assigned permissions for each Group just as previously done for the Application.
Right-click on the Object in the Devices view and select Property > Access Control .
Permissions can be assigned in the following areas:
VIEW - users in the group may only view the contents of the object. No edits permitted.
MODIFY - users may View and Modify, but may not delete the object.
REMOVE - users may delete the object and all its dependencies.
ADD/REMOVE - users may Add or Remove objects that are below this object, e.g. a FunctionBlock.
Actions
Along with placing restrictions on an Object, every Action in the CODESYS IDE may be restricted to certain groups.
This can be accessed by selecting Project > User Management > Permissions.
The items that can be selected include:
COMMANDS - all the commands within CODESYS e.g. Login, Alarm Management, etc.
OBJECT TYPES - permission to create an object e.g. POU, DUT, etc.
PROJECT OBJECTS - additional way to set permissions the objects in the current project.
USERS, GROUPS, PERMISSION - set which Group has permission to Add, Remove or Modify Users, Groups and Permissions.
Logging On/Off
Users may login or logoff through the Project > User Management
For more information on the Security of Projects, go to the CODESYS Help at **SecureProject**
Project File Encryption
By default, the project can be opened by anyone. The project file can be encrypted using the Security section of the Project Settings.
There are three levels of protection available.
To create the initial password to open a project, go to Project > Project Settings > Security and select the Encryption, Password options and define a password.
Every time thereafter the CODESYS IDE will be prompt the user to login (at this point the files are encrypted).
To use Certificates to encrypt your project, refer to online Help at Certificates
IDE to Device Connection Encryption
Communication with the device can be protected by means of encryption and user management on the device. You can change the current security preset on the Communication Settings tab of the device editor.
For more information on the Security of Communication, go to SecureComm
Encrypt Boot Application and Download
To encrypt boot applications, downloads, and online changes with a certificate to make sure that the application on the controller cannot be exchanged at will. Download a corresponding certificate of the type “Encrypted Application” from the controller and install it to the “Windows Certificate Store” of your computer. This certificate is required for all development environments that need to make changes to the application on the controller.
For example, if this application needs to be downloaded from another computer, then the certificate also must exist on this computer.
For the details of the procedures, see SecureBoot
Visualization Security
Protect the connection between the web server of the controller and the visualization client with the following measures:
Configure an HTTPS connection (encryption with SSL/TSL) between the visualization client and the web server.
Restrict access to the visualization and configure a visualization user management.
For more information on the Security of Visualizations, go to SecureVisu1 also SecureVisu2
An example project is located in the Setting up WebVisu section of the site.